Service Manager
This is the latest version of the help for Ivanti Service Manager 2018. If you cannot find some of the features described in the help, you may be using an older version of the application. To upgrade the application, click here.To view the help for the latest version of Service Manager, click here
Working with the Web API
•Creating a Link to a Request Offering
About the Web API
The Service Manager Web API module is a framework with sample methods that can be used to integrate external web applications with the Self-Service Portal and the Service Catalog. Developers can retrieve data from the Service Manager database and publish navigation links to specific Service Manager application pages. It can also offer pass-through authentication for external users.
This API is a self-contained developer tool and includes instructions on how to load the Service Manager Web APIs into the external application page, how to authenticate, and more.
Creating a Link to a Request Offering
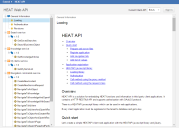
1.From the Configuration Console, click Extend > HEAT API to go to the HEAT Web API workspace.
2.From the left pane, click SearchOfferings. The system displays a list of available request offerings.
3.Click a service from the list. A web page opens with the link in the URL area. For example:
http://heatsoftware.com/?Scope=SelfService
&CommandId=New
&Tab=ServiceCatalog
&Template=AE3E70C3BBFF470597EA1134FECE464D
&frameless=false
&role=Admin#1390514684377
4.Remove the role from the link. The remainder is what you can send to users as a link to the service offering.
About Timeouts
While making web service calls, note the following:
•A Microsoft SQL timeout exception occurs when any query takes more than 60 seconds.
•A request timeout occurs when the API call runs for more than 90 seconds in the Service Manager Application Server.
Cloud Connect API Methods
The following methods have been added to the Service Manager Web API to enable the manipulation of service requests.
| Method | Description |
|---|---|
|
GetCategories |
Returns the list of available categories for the Service Catalog. |
|
GetCategoryTemplates |
Returns the list of request offerings in the Service Catalog, which belong to the indicated category. |
|
GetAllTemplates |
Returns the full list of request offerings in the Service Catalog. |
|
GetSubscriptionId |
Fetches the subscription ID that corresponds to the request offering for the current user. |
|
GetPackageData |
Retrieves the details of the indicated request offering. |
|
UserCanAccessRequestOffering |
Checks whether the current user is entitled to access the request offering. |
|
SubmitRequest |
Creates and submits the service request, on behalf of a user. |
|
GetRequestData |
Retrieves the data for the service request. |
|
FetchServiceReqValidationListData |
Fetches the allowable validation list data for the service request parameter. |
Working with API Keys
•Linking an API Key to the API Key Group
About API Keys
You can link user groups to one or more API (application programming interface) keys, which are codes that authenticate access and can be used to track API usage. API keys are not tied to user sessions with expiration times.
When using HEAT Desktop and Server Management (HEAT DSM) you can use the API key to grant access for a specific user trying to access a HEAT DSM application installed on a specific computer.
You must link an API key to a specific key group to grant user access. Use key groups to structure API key access. For example, you can restrict API key usage to specific users, or to groups of users logging in under a specific role.
Viewing Your API Keys
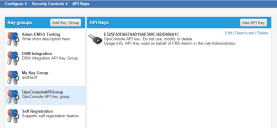
1.From the Configuration Console, click Configure > Security Controls > API Keys to open the API Keys workspace. The system displays the API keys.
Adding a Key Group
1.From the Configuration Console, click Configure > Security Controls > API Keys to open the API Keys workspace. The list of API keys appears.
2.Click Add Key Group. A blank key group form appears.
3.Enter information into the fields.
•Name: A unique name for this API key group.
•Description: A brief description of this API key group.
4.Click Save Key Group. The API key group now appears on the list.
Linking an API Key to the API Key Group
1.From the Configuration Console, click Configure > Security Controls > API Keys to open the API Keys workspace.
2.Click Add API Key. The system displays the New API Key workspace.
3.Enter information into the fields.
| Field | Description |
|---|---|
| Reference ID | Automatically generated by the system. Is associated only with this key group. |
| Activated | Specifies that this API key has been activated. This option is selected by default. Uncheck this option to disable this group as an active key group. If not checked, this key cannot be used until it is activated. |
| Description | A description of the API key. |
| On behalf of | The employee on whose behalf you are creating the new API key. You can restrict the employee to one or more specific addresses. Choose an employee from the list, then click Select. |
| In Role | The role to associate with this employee. |
4.By default, this user can access the API from any IP address. To restrict the employee to one or more specific addresses, click Add new IP. Enter a valid IP address and click OK.
5.Click Save Key.
6.Click Back to return to the main Manage API Keys page.
Deactivating an API Key
1.From the Configuration Console, click Configure > Security Controls > API Keys to open the API Keys workspace.
2.Click Deactivate next to the key to deactivate. The link changes to activate.
Deleting an API Key
1.From the Configuration Console, click Configure > Security Controls > API Keys to open the API Keys workspace.
2.Click Delete next to the key to delete. The key no longer appears.
Was this article useful?
The topic was:
Inaccurate
Incomplete
Not what I expected
Other
Copyright © 2018, Ivanti. All rights reserved.

